Creating sustainable clothing can be a challenge, while increasing the sustainability of your wardrobe can also be quite challenging. Finding sustainable fashion options, for your clothing needs, is only one quarter of the picture. Another quarter is fiber choice and transport, while the last half is split between longevity and clothing disposal.
Keeping clothing in use and out of the landfill increases that clothing’s sustainability and also decreases its earth impact. Mending, repairing, and up-cycling are all ways to increase sustainability and decrease what ends up in the landfill.
The longer clothing lasts, the less new material needs to go into clothing manufacture. An already existing garment does not increase its ecological cost because it lasts, instead it decreases it. That is why thrift store items are a good idea. Not only are they easier on your wallet, but it keeps the already-spent ecological cost of manufacturing from increasing because the garments end up in the landfill. It also delays the ecological cost of new clothing production. Of course, up-cycling garments delays that land-fill cost even more, and on some garments up-cycling could set the land-fill cost back nearly indefinitely. After all, that up-cycled jean rag rug won’t be wearing out any time soon!
Making Clothing Last:
In the past, I discussed a simple method to repair small and awkwardly shaped holes in fabric garments, moth holes in wool, or tiny wear holes that are in areas you wouldn’t want a visibly obvious patch. I also discussed massive mending style repairs, a technique that works well for worn out jean knees, old and well-loved blankets, or those awkward “caught on a cabinet” rips that can ruin the newest and sturdiest garments in an instant.
Of course, something with a large amount of wear, or super massive rips, may well be better off being up-cycled as opposed to repaired. To repair, or not to repair, is up to you.
The most common failure I have encountered, on all kinds of clothing, is the way the buttons are stitched on. There seems to be an especial problem with mass produced garments having easily unravel-able button stitching. From shorts to blouses and jackets, missing buttons can be the bane of the mending pile.
I like keeping a button jar, with buttons from various up-cycle projects, mixed buttons from thrift stores, and other miscellaneous buttons especially for when buttons go walking. I also try and save any buttons that come with a garment, and if I catch a loose button I try and secure it before the button itself goes MIA (missing in action).
Helpful Tools for Quick Repairs:
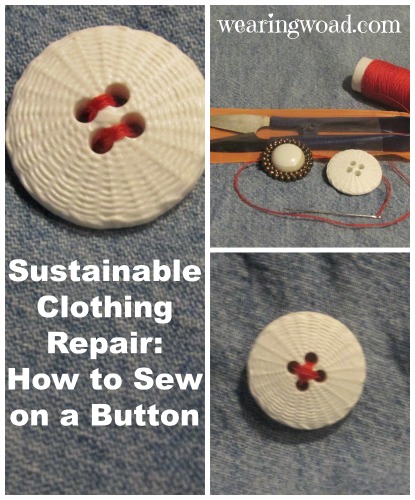
I like keeping a few things on hand for emergency clothing repairs. This includes a pair of thread shears, or embroidery scissors, cotton thread, and of course the ubiquitous quilting short as my preferred sewing needle.
If you are doing up-cycling, refashioning, or anything else that requires taking clothing apart, remember to save the buttons. Having a good selection of buttons is very helpful when the one from your favorite blouse or pants end up missing in action.
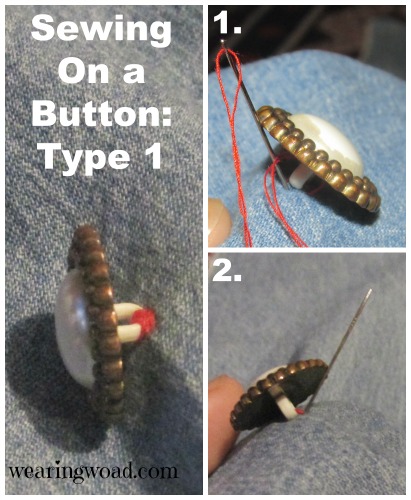
Sewing on a Button: The Fancy Button (button has a shank not holes)
Shank buttons require a slightly different technique than a normal blouse button. Shank buttons do not have holes. Instead, they have a single “shank” that the thread is secured through. A shank button could also be termed a single-hole button.
Start by finding the old button location on your garment. This will often have a bit of wear if the button pulled off, or the remains of the old button-securing-thread poking out of the fabric. 
Now, grab your button, a threaded needle with matching (or at least not contrasting) color thread. And, a pair of embroidery scissors. For the pictures, I used a contrasting color so that it would be easy to see what was going on. If the buttons were going on clothing, I would have used navy or white thread, not red.
First, clean up all old fuzzy thread in the vicinity and make the spot nice and clean. Poke a pin, or your threaded needle, in to mark the location of the button. If this needs to line up with a particular button hole, fold the button hole over and make sure your button marker is in the right location.
Secure the knotted end of the thread on the inside of the garment, then slip your button over the needle and down against the fabric. Make a stitch as close as possible to where the thread came through the fabric initially.
On the backside, poke the needle back close to the initial entrance and pull all the way through. You will have to angle the needle, as the back of the button will block straight-up stitching. Then, go through the shank (pull the thread all the way), and then back down through the fabric. Again, this will require working at an angle around the button.
As sewing needles are not flexible enough to bend around the shank, at least without making huge stitches that will pucker the fabric, a three step stitch is the most effective for a shanked button.
Repeat process ten to sixteen times, until the shank of the button is completely covered in thread.
To finish the button, on the back side of the fabric, run several stitches around the button-securing threads. Knot thread as per a normal sewing bind off, run the thread back through the fabric to the top side, and wrap around the shank of the button, usually three wraps. Bring back to the rear and knot again to finish. When trimming the thread off the secured button, be careful to cut only the bound off thread and none of the active threads.
How to Sew on a Button: Dress-Shirt Buttons with Holes
These buttons are the simplest to sew on. Just make sure that you use a matching, or complementary, color as the thread is obvious on these buttons, where it is not obvious on the shanked buttons.
Choose your thread, thread your needle, and get your button in position.
Once ready, insert the needle from the reverse side of the fabric, up through one of the button holes. If working with a two hole button, simply put the needle down through the other hole and then back up through the first hole. Repeat until ten or so layers of thread are securing the needle. Put a few extra stitches around the base, bring to the top side of the fabric under the button and wrap a few times. Then take it back to the reverse of the fabric and bind off. 
The only difference between a four hole button and a two hole button is that there are two possible ways to sew it back on. You can either alternate paired holes, so that you have matching verticle or horizontal threads. Or, you can sew it on cross-wise so that the threads cross in the middle. On a four hole button, I like doing one side, then the other, and alternating them to make the most secure fastening I can.
Bind off in the same way as per the other buttons.
What Do I Do When the Button is MIA?
Buttons go missing in action all the time. Normally, with a button jar, and a normal shirt or blouse, that is no problem. Just find a button of a similar size and colour and replace it.
However, if it is an obvious button like the mid-chest button on a blouse and you have no matching buttons, take a hidden button from somewhere else on the garment. Replace that hidden button (one that would be tucked into a waist band or the second and normally invisible button on the cuff) with as close a match as you have and use the matching button to replace the obvious missing one.
If you have a longer dress with buttons down the front and one goes missing, you can take the bottommost button to replace the more obvious missing button. Then replace that button with a same size and color button. Alternatively you can also sew up the bottom portion of the dress and the button hole and only replace the bottommost button as a visual element instead of a working fastening.
Dress jackets can also have their buttons go missing in action. In my mind, the best way to deal with a missing front button, on a formal jacket, is to have a bit of fun. This tactic works best if it is a three button jacket. Simply take off one of the two remaining matching buttons, and replace it and the missing button with same-size but different buttons from your button stash (you have one right?). With three artistic buttons, it is now a style choice and no one would suspect you of having had a button go missing in action!
Jean Button Repairs:
Jean buttons are actually rivets. Thus, if the button on your jeans goes missing, you will not be sewing that particular button back on.
First, if it ripped out, repair the fabric enough to hold a regular button. Then, grab a similar size, shanked button preferably silver or metallic toned. Sew the shanked button on in place of the original rivet. With jeans, the use of a very sturdy thread is recommended, if you only have polyester or wrapped sewing thread, I would recommend using fine dental floss. Then your thread will not break or wear out easily.
One bonus on jean is that the thread you use to repair the button will always be invisible. So, it doesn’t matter if it is white dental floss, or hot pink sewing thread. No one will ever know, unless you decide to show off your repair job!
Back To You:
What mending techniques do you use, or would like to learn, to increase the longevity of your clothing?
What tactics would you suggest for increasing clothing sustainability in a gradual and easily sustained manner?
Leave a comment, I enjoy hearing from you!