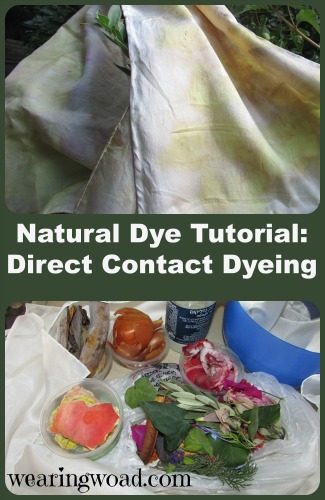
Experiments are one of my favorite things to do with fiber and natural dyes. It is always exciting to unveil something, and not have a clue what it will look like because it was all an experiment. It also means it is never boring, and always fascinating. One of my favorite natural dye experiments to play with uses the “direct contact dyeing” method. This is a short technique explanation and tutorial, no two attempts at direct contact dyeing are ever the same. 
In this method, you apply raw plant material directly to fabric, heat and macerate it, then let it ferment for a bit before cleaning and drying the fabric. You can get imprints of the leaves and plant material you use, as well as unexpected colors and effects from unknown dye sources. It’s always fun to use woad in direct contact dyeing, as the woad ferments and leaves blue leaf prints on the fabric.
Since I was in Israel, and had plenty of unknown plants hanging around. I decided to do up a quick direct contact dyeing tutorial while simultaneously experimenting and seeing what colors I could get from all these fascinating plants. I broke some of my normal natural dye rules, like using fruit and fruit skins, which I normally would not use.
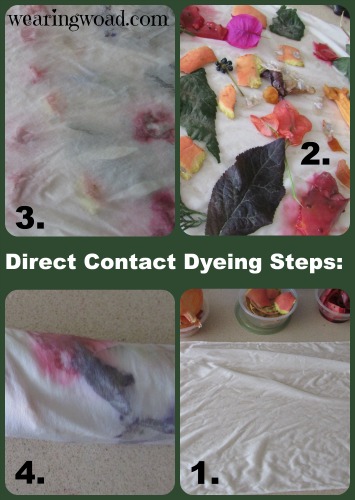
Steps in Direct Contact Dyeing:
- Prepare your fabric of choice. I like using silk scarves. They are light, easy to transport and ship, and silk takes dye exceptionally well. Which makes it a good candidate for this technique. You can also use cotton or wool fabrics, usually the thinner the better. For my experiment I used one thin silk scarf, and one thicker silk scarf. The thicker scarf has a “right” and a “wrong” side, which is necessary to remember when using this technique.
- Cleanse your fabric, and mordant it. Use a normal alum mordant if possible. For variations during the dye process, you can wrap the fabric around an iron spike, or a copper tube, which will provide a color-shifting mordant effect where the fabric touches the metal and where the metal leaches through the fabric.
- Gather your natural dye stuffs. I went with flowers, leave, fruit skins, berries, and basically anything and everything that looks like it could be a useful dye. If you are gathering over-time, feel free to freeze the dye stuffs. Just remember to take it out to thaw when you are preparing your fabric canvas.
- Wring out your fabric, and lay out half of it on a flat surface. If your fabric has a “right” and a “wrong” side, make sure the right side is facing up.
- Lay out a design in your chosen mix of dyestuffs. You can do straight lines, blocks, leave designs, basically anything you want. If you have items that you know will make fast colors, spread those around the more “unsure” stuffs, so that there will still be visual interest.
- Fold the un-decorated half of the fabric over the half with the plant material on it. Then, roll it up into a nice fat fabric/dyestuff roll.
- If you have a microwave, throw it in there for 30 seconds. If you don’t, drop the scarf and dyestuff into a sealed plastic bag and put into a bowl of hot water until thoroughly warmed.

- My favorite step. You then pound, punch, or stomp the roll to bruise and macerate the warm plant material. This bruising releases the dyestuffs into the fabric, and is a necessary step. If you live in a house, feel free to pound it with a wooden mallet or similar instrument. If you are in an apartment, like I was for this experiment, punching or walking on it is probably the quietest method.
- Set aside and let ferment for at least 24 hours. I warmed my experiment a second time at the 24hr mark, and then set it aside for a further 48 hours. I did not want to leave it longer than 48 hours, as I do not want mold to develop.
- Take the fabric out of its bag (it will smell fermented), and rinse off in a bowl of lukewarm water. Dump the water and plant material into the compost, or down a toilet if you do not have a compost pile. Let dry, and iron to help fix the color. Then wash with a pH neutral soap in lukewarm water and let dry again.
Notes on Direct Contact Dyeing:
If you use a dye material that you do not know, you may want to make sure your dyed fabric does not get left out in full sun.
As many natural dye stuffs can be pH sensitive, always wash something that is naturally dyed with a pH neutral soap.
You can use almost any plant material for direct contact dyeing, even fungi and dried plant material. The idea of direct contact dyeing is to experiment and have fun. It is not to get a particular result, unless you are using a plant that you can guarantee will turn out a particular way, and even then you may well be surprised. This method does take some patience, and also a measure of remembrance so that it the plant material doesn’t mold.
However, it is also a fun project to do with children. They can gather the plant material they want, lay it out, heat it, and pound the living daylights out of it. If it’s done just before a weekend, there is no impatience about the fermenting time, and by the next week they have a fun and awesome project that they designed.
Of course, using known dye plants will make the results more secure. But, where’s the fun in that? Half the fun is experimenting and potentially making a complete mess of things. But that’s what over-dying fixes, so no worries!
Back To You:
If you have ever used a direct contact dyeing method, what were your results? Do you enjoy this type of experimental natural dyeing or do you prefer more controlled methods?