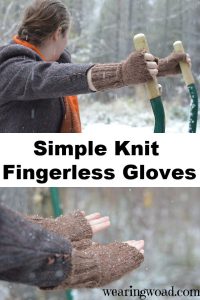
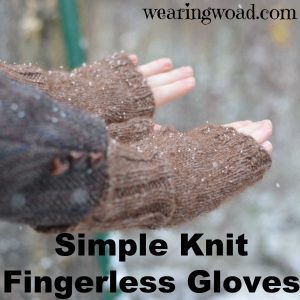
No matter what time of year it is, it can be very easy to end up in a last-minute gift related panic. While socks seem small and simple, they really aren’t the quickest knitted gift. Buying a gift is easy, the defaults for quick gifts (hello chocolate!) may not be the “best” idea. If you are a knitter, and enjoy creating gifts, then a simple pair of fingerless gloves may be perfect for that one more gift need. These are easier and quicker than socks, and a personal favorite since you can vary them in a nearly unlimited range of ways. 
This year, December felt like it crept up on me. And, on the 17th, I realized I didn’t have a decent gift for my apartment mate. Since we are both working on being healthier, fitter, and stronger, I knew that chocolate would not cut it. But, it is chilly in Jerusalem, and I knit fast. Hence these cute fingerless gloves.
For another quick knitted gift option check out this quick knitted phone case.
These gloves are perfect whether you are driving, typing, or walking. They keep your hands warm, but not too warm, and can be knit in two afternoons or less. I finished the first glove in less than 24 hours, starting it before church and finishing it in little minutes during the afternoon. Of course, if you are a slow knitter, this may take longer.
Knitted Fingerless Gloves Pattern
For this pattern, I found a nice self-patterning yarn at the local hole-in-the-wall yarn store. While the store doesn’t have a huge selection of yarns, this particular colorway had caught my eye a few months back and I’d been thinking of what I could create with it. Knitted fingerless gloves seemed to be the perfect use for this yarn.
While the yarn itself recommends using a 4-4.5mm needle, I ended up using a 5.5mm double pointed needle since I knit tight. If you knit loose you may want a slightly smaller needle.
My gauge was: 4 stitches per inch, and 5 rows per inch
Cast On: 32 stitches, divide onto three double pointed needles (12, 12, and 8). If you need a larger glove, for a man or a woman with larger hands, cast on more stitches in a multiple of 4. This makes your knitting easier as you will be able to set up your needles to always end on a purl, and start on a knit stitch. Then you never forget “what stitch was the start of this needle again?” if you have to stop in the middle of the row.
Cast on one extra stitch and transfer it to your starting needle.
Knit two together to join the sides of your cast on to make a circle.
Knit two, purl two, and repeat to the end of the row. With circular knitting, you do not have to alternate stitches, as the circular structure does it for you.
Repeat standard ribbing repetitions for 4-6 inches of knitting, depending on how long you desire the cuff of your glove to be.
Creating the Thumb:
Knit one row in just knit. On your needle with the fewest stitches, knit into the front and back of the 4th stitch to create an increase. Set a stitch marker on either side.
Knit a second row, and knit into the front and back of your marked stitch. You should have two stitches within your stitch marker. All rows of knitting at this point, should be plain knit stitch.
On the third row, knit into the front and back of BOTH stitches between the stitch marker. Giving you four stitches.
Repeat, knitting into the front and back of the first stitch after your stitch marker, and the last stitch before your 2nd stitch marker, until you have 14 stitches between markers. Once you have increased to 14 stitches, grab a stitch holder or piece of scrap yarn.
On the next knit row, transfer the stitches between the markers to your stitch holder or piece of scrap yarn. Knit the rest of the row as normal. The stitches joining around the thumb gusset may have to have the yarn pulled a bit tighter to help prevent gaping.
Finishing the Hand:
Knit the next few rows and try on your glove. I prefer a glove that is tighter on the fingers, so after the thumb division I usually only knit 5-8 rows before beginning ribbing again. If your fingers are longer, you will want to knit further before beginning the ribbing. Ribbing is the standard alternating knit two, purl two.
Knit/rib until your glove is the length you desire. Cast off loosely.
Knitting the Thumb:
Pick up your stitches that are on the scrap yarn. Carefully pick up three or four stitches on the side of the glove, onto a spare needle. You WILL need to twist these stitches slightly to make them proper stitches, and prevent gaps. Carefully split your picked up stitches onto three needles, and use a fresh piece of yarn to start knitting the first row. At the point of the thumb joint (where the thumb joins the hand on the inside where you picked up three stitches), knit two of those stitches together. Knit about 4 rows, and then do a standard ribbing for 4 more rows. Cast off loosely.
Finishing the Gloves:
Weave in all loose ends as normal for knitted work. Wash the gloves in warm, and cold, water to help them finish properly. If using wool, do not agitate if changing temperatures. Dry flat.
Gloves can be embellished with buttons, along the cuff, or embroidery on the back of the hand. Once you have done the basic pattern once or twice, you can vary it with alternating yarns, or adding in cables. This pattern is a blank canvase, which you can use to do any type of variation you want.
I’ve had lots of fun making different patterns and styles of gloves from this basic pattern. So don’t be afraid to experiment. However, be aware that adding in cables or longer cuffs will make the project take longer. Even if you can make it extra special for the person who you are knitting for.
Fingerless Gloves Variations:
Some fun variations include running cables up the back of the glove. One solid cable, or a solid cable with two smaller ones framing it, are both simple and neat options for adding cables to these gloves.
Another fun variation is alternating yarns every two rows. To do this, after knitting two rows you start the third row with a new yarn. Knit two rows with that yarn, then pull up the yarn you used first and use that yarn for the next two rows. Continue doing this until you are satisfied with the alternations. This looks nice just on the cuff, or you can do it for the entire glove. Just make sure that the join point is on the side, or back of the glove and not the palm if you do it for the entire glove.
If you have novelty yarns, you can start the glove with those as the cuff in connection with your base yarn. Cast on and rib four to eight rows with the novelty yarn (eyelash yarns are nice) and base yarn. Then, tie off the novelty yarn and continue knitting with your base yarn. Just write down how many rows you did with the novelty yarn, so the other glove will match. 
Back To You:
Do you like knitting? What do you think of this basic fingerless gloves pattern?
Leave a comment, even if it’s that you’d rather see different types of articles. I love feedback, and I appreciate your impute as I’m returning to activity, with hand-crafts, after a hiatus.