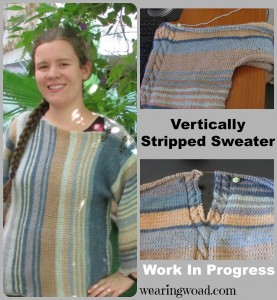
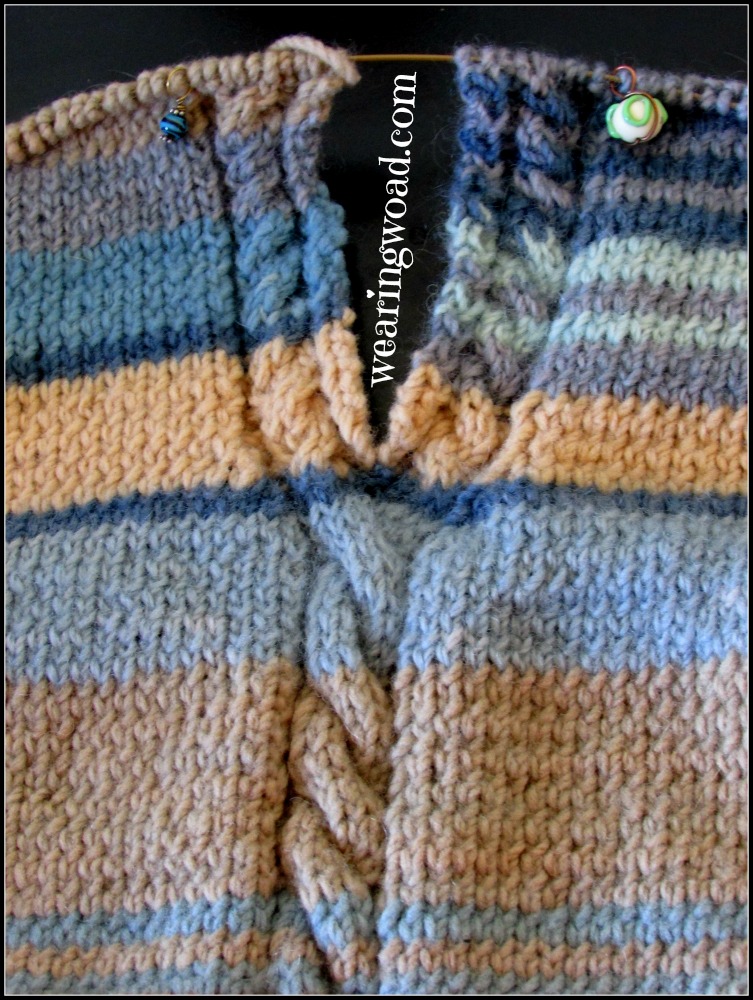
This third part is the increase from just knitting a sleeve, to knitting the shoulder and body of the sweater, and the neck division. While the neck division is a touch complex, the rest of the knitting is straight forward and easy-peasy. Part one covers the sleeve and initial cable, part two shows what the sweater style looks like when completed.
You can see the picture on the side has both the current work-in-progress sweater, and the first sweater I created with this pattern (minus cables), finished this spring. Personally, I like the cable and the definition the cabling adds to the sleeve and neck better than the plain stockinette sweater. However, the two pictures will give you a good idea of what the sweater will look like. 

At this point my sweater sleeve is 86 rows long, or approximately 12 inches.
For The Body and Shoulder:
The gauge is 4 stitches per inch, so for a 13 inch increase I need to add 50 stitches on each side of my knitting. If you are taller, or shorter, you may need to adjust this number.
Starting on a knit row, I knit the row and at the end of it cast on an additional 50 stitches. Then, purl the next row, and at the end of that row cast on a further 50 stitches.
You have an increase of 100 stitches and a total of 190 stitches.
The next knit row after your stitch increase should be a cable row. Knit and cable as normal.
Knit, purl, for 3 cable repeats, or 24 rows. That is approximately 4 inches.
After your 4th cable crossover from the stitch increase for the body, knit one row, and purl one row. You are now ready to begin the division for the neck.
Creating the Neck Division and Split Cable:
This is the 3rd row after a cable crossover.
Row 1: Knit till two stitches from your stitch marker, knit two together. Purl next two stitches, knit 3, knit into the front and back of the next two stitches (this adds two stitches between your cable sides). Knit 3, purl two, shift your stitch marker and knit two together. Knit to the end of the row.
You will now have 14 stitches between your stitch markers.
Row Two: Purl the next row until within two stitches of your stitch marker, purl two together. Knit two, purl 4, purl into the front and back of the next two stitches, purl 4, knit two, shift the stitch-marker, purl two together, and purl to the end of the row.
You will now have 16 stitches between your stitch markers.
Row Three: Knit to within two of the stitch marker, knit two together. Purl two, knit four, purl one knit into the front and back of the next two stitches. Purl one, knit four, purl two, shift your stitch-marker and knit two together.
You should now have 18 stitches between your stitch markers.
Row Four: Purl to within two stitches of your marker, purl two together. Knit two, purl four, knit two, knit into the front and back of the next two stitches, knit two, purl four, knit two, shift your marker and purl two together. Purl to the end of the row.
Row Five: Knit to the first stitch marker. Purl two, cable 4 bringing the cable needle to the front. Purl two, knit two. Pause.
Take the other end of your ball of yarn, or a new ball of yarn. Start the next half with that new tail.
Knit two, purl two, cable cross 4, dropping the cable needle to the back, purl two, knit to the end of the row.
Continue using a 4 stitch cable on each side of the neck, and a separate ball of yarn or yarn tail for each side of the row.
Remember to cross this cable every 4 rows, and that the first cable is crossed in front, and the second cable is crossed in the back.
Knit for 8-10 inches, approximately bra strap to bra strap for an appropriately sized boat neck.
Note: At the point of adding a new ball of yarn to the other side of your sweater, you CAN put those stitches onto a stitch holder and just knit one side at a time. However, the stitches at the point of the split could stretch. Though, with the cable split and increases it is unlikely.
What I did:
Just before the cable split for the neck, I shifted to my slightly heavier yarn. This, combined with the cable split, and the ability to knit both sides simultaneously is keeping the neck split from stretching the stitches. The first sweater I attempted with this pattern I used a stitch holder, and just straight split the sweater with no reinforced stitching, as a result the stitching stretched and required some crochet to make the neckline decent.
The rejoining of the neck, and cable, will be covered in a week or two when I get to that point of my knitting! I have about 6 more inches to knit before creating the join for the other shoulder.
Back To You:
Are you enjoying this pattern? Are the pictures helpful, or would you like more?
Leave a comment!
