So, your loom is warped and ready. If it’s not warped, duck over to the post earlier this week, about warping your rigid heddle loom, and warp up. Once you are warped, and have the warp beamed on the back and tied on the front, you will be ready to begin the fun adventure known as saori weaving. Though you could just refer to it as creative rigid heddle weaving.
A Few Notes on Saori Weaving:
With this style of weaving, you use your weft to provide interest to your weaving. This can be beating harder, or lighter, to make a different feel in the web. At other times, it can mean using tapestry techniques to form colorful patterns and designs. If you decide to vary your beat strength, beat is how well you pack in the weft threads, make sure to keep it firm and not to compromise the strength of your weaving by too light a beat. If you decide to use tapestry, you will have a decided “front and back” to your scarf or fabric, and anything you weave past the midpoint of your warp will end up upside down when worn.
Keeping these things in mind when weaving will help you visualize what you are creating. Anything is then possible through your saori weaving.
My original interest in Saori weaving came through this saori-weaving book.
Step One:
After your warp is tied on the front beam, insert your warp spacers. I used socks for my scarf, if you do use mismatched socks I’d recommend cutting them, they were a little thick. In the past, I’ve used panty hose, thicker yarn, and scraps of fabric to form spacers. I do not recommend using paper for spacers as it neither bends, nor packs. Three or four rows of spacers should be enough.
Step Two:
Load your shuttle for take-off… er warp off? If you are using a stick shuttle, load it via an “x” shape around one side, and then the other. This builds the bulk of the threads on the side of the shuttle, rather than the middle, and you can load more yarn onto it, and it’s easier to handle. 
With loaded shuttle in hand, open the shed, lay the yarn across, and close the shed. Then beat it gently against your spacer. Open the second shed (only two on a rigid heddle) and lay a second line of weft across the warp. Snug the loop of the weft against the outermost warp thread, but do not pull it tight enough to pull the warp thread inward. A good way to avoid selvedge edge pull-in is to bubble your weft across the warp, so that when the weft is beaten into place there is plenty of give. You can always tighten a row of weft with a gentle tug, after it is beaten into place.
Note: After weaving an inch or two, if you do not plan on having a fringe on your saori woven piece, you should secure the edge now. Securing the raw edge is far easier when the fabric is under tension on your loom.
Step Three:
Continue step two until either a. you get bored, b. you run out of yarn on your shuttle, or c. you start wondering what this tutorial is getting you into. Once either A, B, or C, is met, start creating one of the color variations presented below.
Feel free to change between variations, flip around variations, and create your own variations as it feels right.
Other than that, step three is “weave till the end of your warp”
Variation One: Basic Stripes
A basic stripe is simple. You weave one color until bored, and then switch to another color, then another, and then another. Or, if you don’t get as quickly bored as I do, you can switch every four rows, eight rows, or ten rows for narrower stripes.
For a very narrow stripe, use two colors and weave two rows of each, alternating. When doing this, make sure the threads end up on opposite sides when “resting” and that the threads lock-carry on the edge (so you don’t have an obvious two-row thread jump).
Variation Two: Narrow Columns
This is a variation on the basic stripe, that gives a one-thread-wide vertical column when woven. To make this fun little pattern, weave alternating rows of two colors and pack in just a touch tighter than average. Weaving the alternate rows means that the fibers are always over/under the same threads, and so the yarn fills in the gap and makes it look like a single vertical column in the weave.
This technique is a touch finicky, as if you do not loop the weft yarns on the edges of the fabric, they can pull-in in an unusual fashion. So, make sure to have the most recent color always go over the next active color-thread.
Variation Three: Interlocking Tapestry in Three Colors
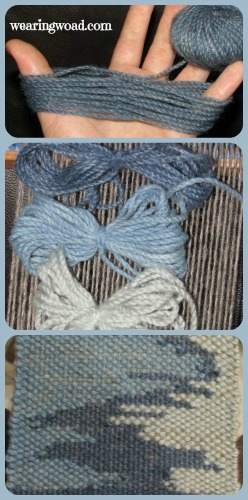
For most tapestry weaving, I prefer working with butterflies rather than a shuttle. This is helpful in saori weaving because it gives more flexibility than a shuttle for creative design. Basically speaking, a butterfly is a collection of thread, wound around your hand, that forms a small, flexible, center-pull. These small butterflies make it easy to interlock weft, weave in small and narrow areas, and you can even end up pretty good at guessing how many rows a certain number of hand-wraps will give you for stripes. 
I prefer using three colors, as it is easy to make sure that the middle color is going opposite ways to the two outside colors. Of course, you can do this technique with just two colors, provided you have two butterflies of the same color on the outside edges, with the different color in the middle.
To begin, open your shed and lay a short line with your currently active warp color. Use your two new tapestry butterflies to lay two other lines across the whole warp. I would suggest having the two new threads end tails against each other, or a little interwoven to secure them. Change shed and beat. Now, starting from the opposite side to the one your active weft started on in the previous row, weave that butterfly back.
If the on-coming butterfly will meet another butterfly, you want it to stay in the same spot. If, however, it does not meet a butterfly, but the other color butterfly will be coming to meet it, you can jump that thread however far you feel like, provided your other color has at least one thread to weave around. Provided your middle color is moving alternately opposite to your side colors, you can make some interesting jumps without leaving surface marks of it.
Make sure to loop your threads around each other on, on alternate rows, to prevent any holes developing in your scarf.
Variation Four: Tapestry Columns
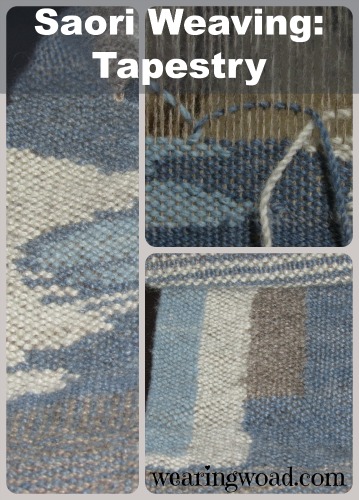
Using the three color tapestry method, you can add a fourth or a fifth color to the mix with ease, and make columns! To make columns, set up each color over an approximately equal number of threads. Then, begin weaving in the same manner as the other three-color method. However, to make columns, instead of jumping around with your weft, you want them to interlock between the same threads every time.
Using this method, you will get solid, if time consuming, columns. You can also use it to make smaller squares, or other patterns if desired.
Note: once you’ve mastered the basic tapestry technique you can use it to make nearly any shape you desire, from circles, to hearts, to triangles, to stuff that’s completely random and fun!
Step Four:
When you’ve reached the end of your warp, and woven to within about 6 inches of the back beam (at least on a Knitter’s Loom), you are ready to take your project off the loom. Note: If you will not be making a fringe on your fabric, you should sew and finish the edge while it is on the loom.
Cut, or untie, the back warp threads and pull through the heddle. Flip off the front rachette on your loom and pull your beautifully woven fabric forward.
Pause to admire your beautiful saori weaving.
Then untie the front beam and remove the spacers.
Step Five:
Tie overhand knots along the two raw edges of your finished scarf to form a fringe. I had 44 ends on my scarf, and so tied four threads into each knot. A fairly standard practice is to tie in groups of six. But, personally I prefer the look of a finer fringe.
Step Six:
Wash it! Don’t trim the fringe yet or any of the ends. Wash in hot, soapy water, and rinse in cold to encourage the fibers to soften and meld together. I would even recommend agitating the fibers if you are working with wool, so that they fluff up and lock together. You want to achieve a slightly fuzzy fabric, which you cannot work a hole through with your finger (at least not easily), and that still has plenty of relaxed drape.
Once you are satisfied with the washed product, hang to dry
Step Seven:
Once your scarf is dry, trim the fringe. If desired, you can now twist and tie the fringe for an even neater look. Also, trim the spare ends on the back side of the scarf.
Press with a steam iron set to wool.
Wear with pride, or gift, depending on what you were planning for this project.
End Notes on Creating Your Own Saori Scarf:
For the scarf I created, I used entirely woad-dyed blue yarn, and some natural brown/grey that I had on hand. I like how saori weaving enables you to highlight specific colors, or dyes and showcases the beauty of how natural dyes can work together to make beautiful garments.
Saori weaving is a bit time-consuming, and the weaving itself took me around 3 hours. Warping took one hour, and the final finishing took about 30-45 minutes. Thus, a saori scarf could be an afternoon project. But, will work best if stretched over one or two days, with the final finishing on the third day when the scarf is fully dry.
If you intend the scarf to be a gift, you can always get the person’s feedback on the color palette that you intend to use, and may even be able to create a facsimile outline of something they are interested in through using the tapestry weaving techniques.
One thing I can guarantee however, a saori woven scarf will always be unique. Even if you try to imitate a specific pattern, what you produce with saori weaving will be unique to you.
Warning: Extensive use of looms and weaving paraphernalia, combined with watching Star Trek, may cause unusual pun production.
Warp speed: the speed at which the average weaver can successfully warp a loom, sometimes confused with a drive aboard the Starship Enterprise.
Back To You:
Have you ever woven using the Saori Weaving technique? What is your favorite weaving technique for gifts or projects? And just for fun, what is your favorite weaving pun?
Leave a comment, I enjoy hearing from you!